
Course The Rose - your first invoice (#5)
Everything is ready: your organisation details, your clients, your products. Time for the invoice itself. In this part you create one from start to finish, and you learn the difference between a draft, a created and a sent invoice. That difference is the most important thing to take away from this part.
Part 1: opening a new invoice
Click Invoices in the sidebar and then Create (or use the Actions button on a client and choose a new invoice there: then the client is already filled in). You land on the invoice form:
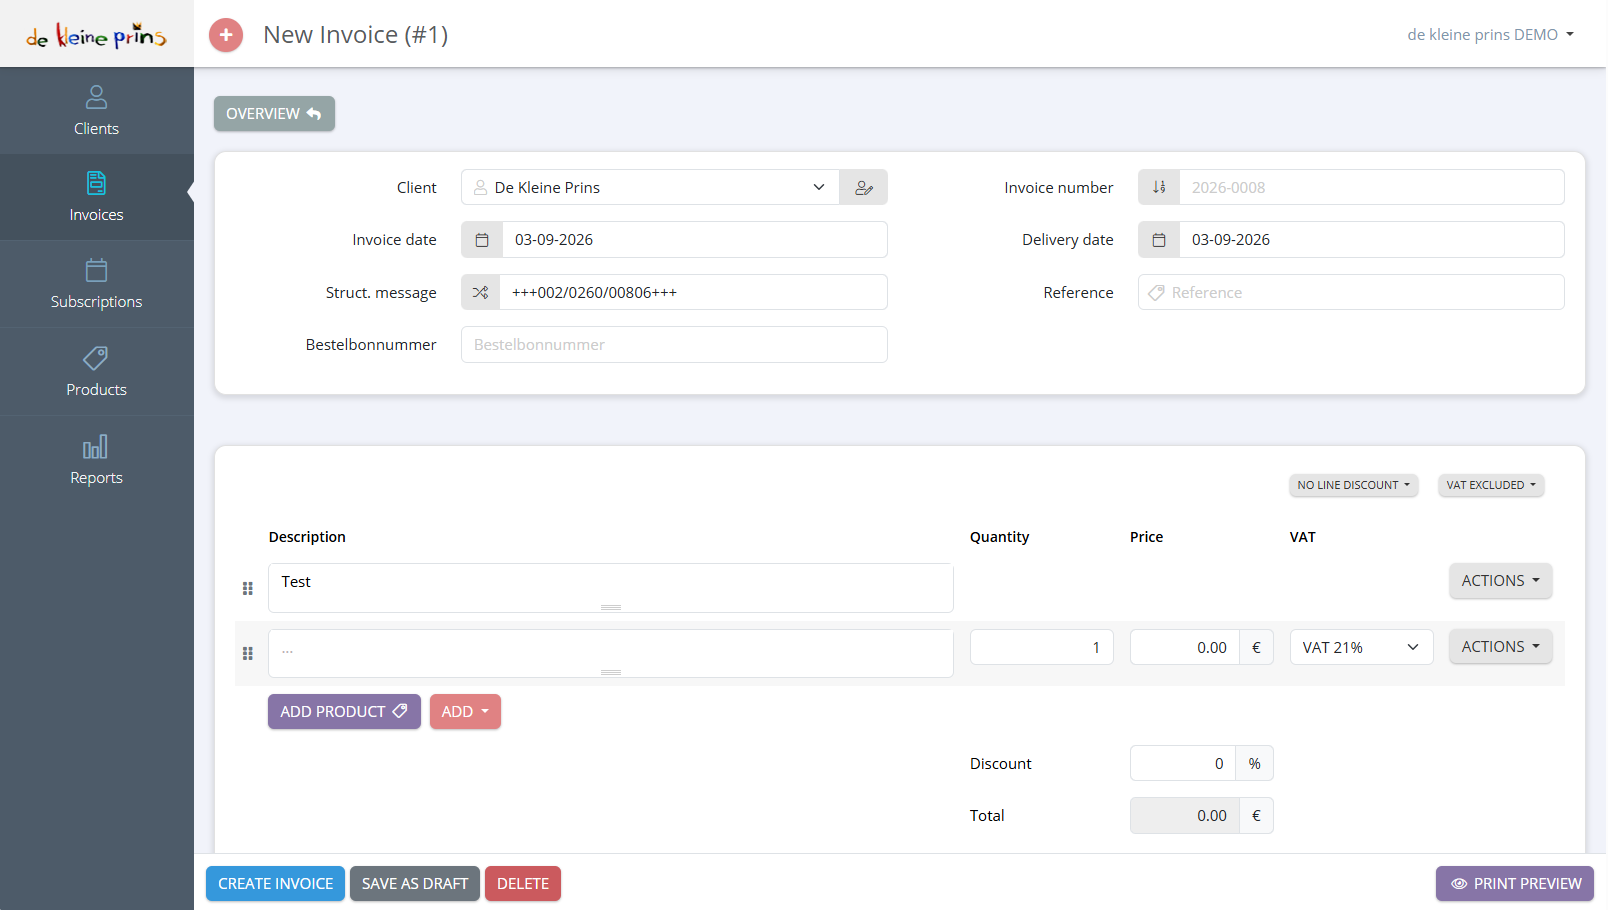
- Client: choose from your client list. Type a few letters to search. The icon next to it opens the client details.
- Invoice date and Delivery date: today by default. The delivery date is the date on which you provided the service or delivered the goods; that mention is mandatory if it differs from the invoice date.
- Struct. message: filled in automatically if you switched on the structured message (course part 2). Do not change it.
- Invoice number: grey and automatic. The Rose assigns the number definitively the moment you create the invoice, not before. Here in the demo file you see the next number in the series, 2026-0008.
- Reference and Bestelbonnummer (purchase order number, a custom field in our demo file): free fields for what your client needs in order to pay, e.g. the number of a municipality’s purchase order or the member’s name. What is entered here is transmitted via Peppol (order reference).
- The invoice lines with Description, Quantity, Price and VAT. With Add product you pick a product from your list (course part 4); with Add you create a free line, a text line or a subtotal.
- The toggles No line discount / VAT excluded: determine whether you can give a discount per line and whether the prices entered are excluding or including VAT.
- Discount (on the whole) and Total.
- The buttons at the bottom: Create invoice, Save as draft, Delete and Print preview.
Part 2: filling in the lines
Click Add product and choose, for instance, your product Membership fee. Description, price and VAT rate are taken over. Adjust the Quantity and complete the description with what makes this invoice unique: “Membership fee season 2026-2027, Jan Peeters”.
Handy line types under Add:
- Free line: something you rarely charge for and for which no product exists.
- Informative line (text without amount): for an explanation in the middle of the invoice, e.g. “Re: use of the hall on 14/03/2026”, or the VAT exemption mention if you did not put it in your layout.
- Subtotal: to structure a long invoice, e.g. per activity.
Check the VAT rate on each line. The rate comes from the product, but you can adjust it per line if this specific service differs.
Part 3: draft, created, sent
This is the most important thing to understand. An invoice goes through three stages, and at each stage what you may still do changes:
- Save as draft stores the invoice without a number. A draft may be adjusted without limit and even deleted; it does not yet exist for accounting purposes. Use it if you are still missing details, or if a colleague has to check the invoice first.
- Create invoice gives the invoice the next number in the series and puts it in your overview. As long as you have not yet sent it, you may still adjust it: open it and click Update, or choose Update in the Actions menu of the overview. It has not yet been sent to the accounts. Preferably do not delete a created invoice: the number has already been issued and a gap in the series has to be explained.
- Send (course parts 6 and 7) is the turning point: at that moment the client receives the invoice and The Rose sends it to our accounts (course part 11). From then on you do not adjust the invoice any more. If there is a mistake in it, you correct it with a credit note and a new invoice (see course part 10).
Why so strict after sending? An invoice is a legal document with a unique sequential number. Whoever changes a sent invoice makes the trail between what the client received, what is in your accounts and what is in your VAT return unreliable. How strict The Rose itself is, you set under Settings → Advanced → Updating invoice: Deny if already printed or sent to client, Deny if already sent to accounting or Always allow. Leave that on the first option; then it cannot happen by accident either.
Before you click Send, always look at the Print preview first: that way you see the invoice as your client will receive it.
Part 4: viewing the invoice
After Create invoice you land on the invoice view:
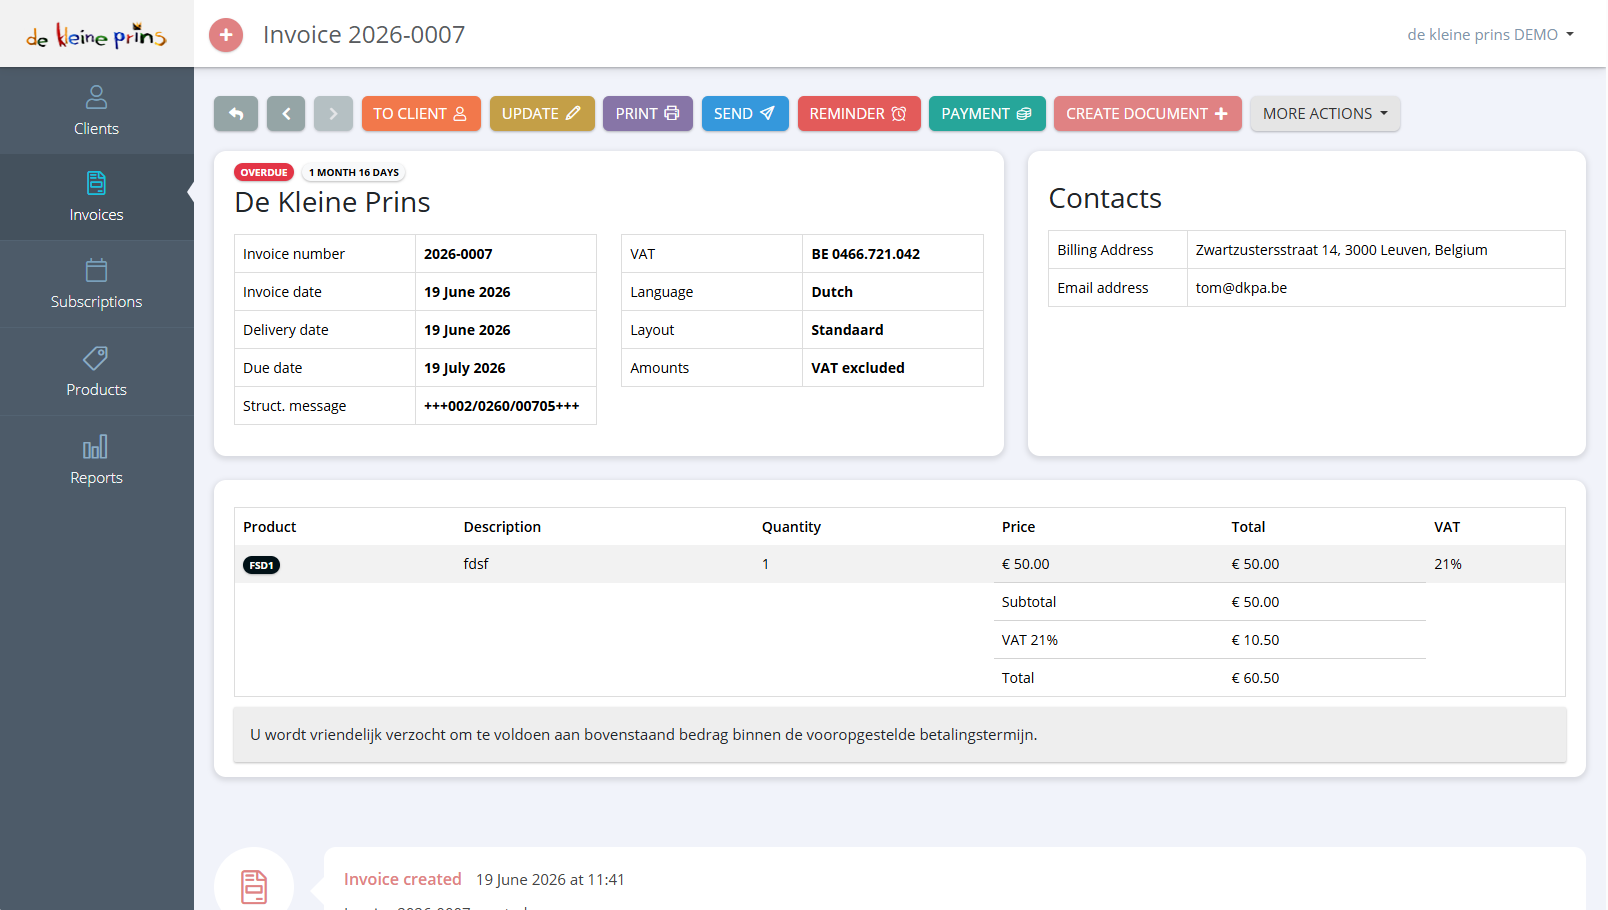
- The button bar: To client, Update, Print, Send, Reminder, Payment, Create document and More actions. You learn sending in course part 6, payment and reminder in course parts 8 and 9.
- The status in the red label at the top, here Overdue with the delay next to it. A freshly created invoice has no label yet.
- The invoice details: number, dates, due date (calculated from your payment term), structured message, the client’s VAT number, the language, the layout used and whether the amounts exclude VAT.
- The client’s contacts: billing address and the email address it is sent to.
- The lines with subtotal, VAT and total, and the fixed closing sentence from your layout.
- At the bottom the history: each step (created, sent, reminded, paid) with date and time. Handy in discussions with a client.
You find all these actions without opening the invoice too: in the Invoices overview each row has an Actions button on the right with the same choices. How to read and use that overview is in course part 8.
Part 5: what must be on an invoice
The Rose puts all of this on your invoice automatically, provided your settings (course part 2) and client details (course part 3) are correct. As a check, the mandatory mentions under Royal Decree no. 1, art. 5 of the Belgian VAT Code:
- the date of issue and the sequential number;
- the identity of your non-profit: name, address of the registered office and VAT or enterprise number (plus the RPR mention from the Companies and Associations Code, see course part 2);
- the identity of the client: name, address and, for an organisation, the VAT number;
- the date of delivery or service if it differs from the invoice date;
- the description and quantity of what you supply;
- per VAT rate the taxable amount, the unit price excluding VAT, any discounts, the rate and the VAT amount;
- if exempt: the reference to the legal provision granting the exemption;
- for a credit note or a corrective invoice: the reference to the original invoice.
Not mandatory but strongly recommended: your account number with the structured message, the due date and a contact address for questions. Those are in your layout (course part 14).
Part 6: an invoice to a private individual
To a private individual you are, as a rule, not obliged to issue an invoice (it is an ordinary sale to a final consumer), but you may, and many non-profits do so for clarity. Create the client as a private individual (without VAT number); The Rose then sends the invoice by email and not via Peppol. Be careful with personal data: do not put more on the invoice than necessary (name and address suffice, no national register number or date of birth).
State of the regulations: September 2026.
Next step: in course part 6 you send the invoice by email.
The screenshots on this page show the English interface of our demo file in The Rose.