
Course The Rose - registering and tracking payments (#8)
Creating invoices is one thing, getting paid another. From this part on it is about what happens after sending. First the simplest: seeing which invoices are outstanding and registering a payment you received, so that The Rose knows the invoice is settled and no reminder goes out.
Part 1: reading the invoice overview
Click Invoices in the sidebar. The overview shows per row the number (Invoice), the Date, the Client, the Description of the first line, the Total and the Status. At the top you search by text, filter by status (Drafts, Outstanding invoices, Overdue invoices, Paid invoices, All invoices, or a period such as All invoices this quarter) and by client (All clients), and choose between list and table view. Under More actions you find Import From Excel and Export To Excel. Each invoice has a status, and that status drives everything that follows:
- Draft: not yet created, no number (course part 5).
- Open: created and not yet due. Whether it has been sent, you see from the delivery icon (course part 6).
- Overdue: the due date has passed and no (full) payment has been registered. The label shows straight away for how long (“1 month 16 days”). These invoices qualify for a reminder (course part 9).
- Partially paid: a payment has been registered for less than the total.
- Paid: fully paid, with an icon showing how the payment was registered. Tracking stops here.
Filter by status to see everything still outstanding in one click; sort by date to get the oldest first.
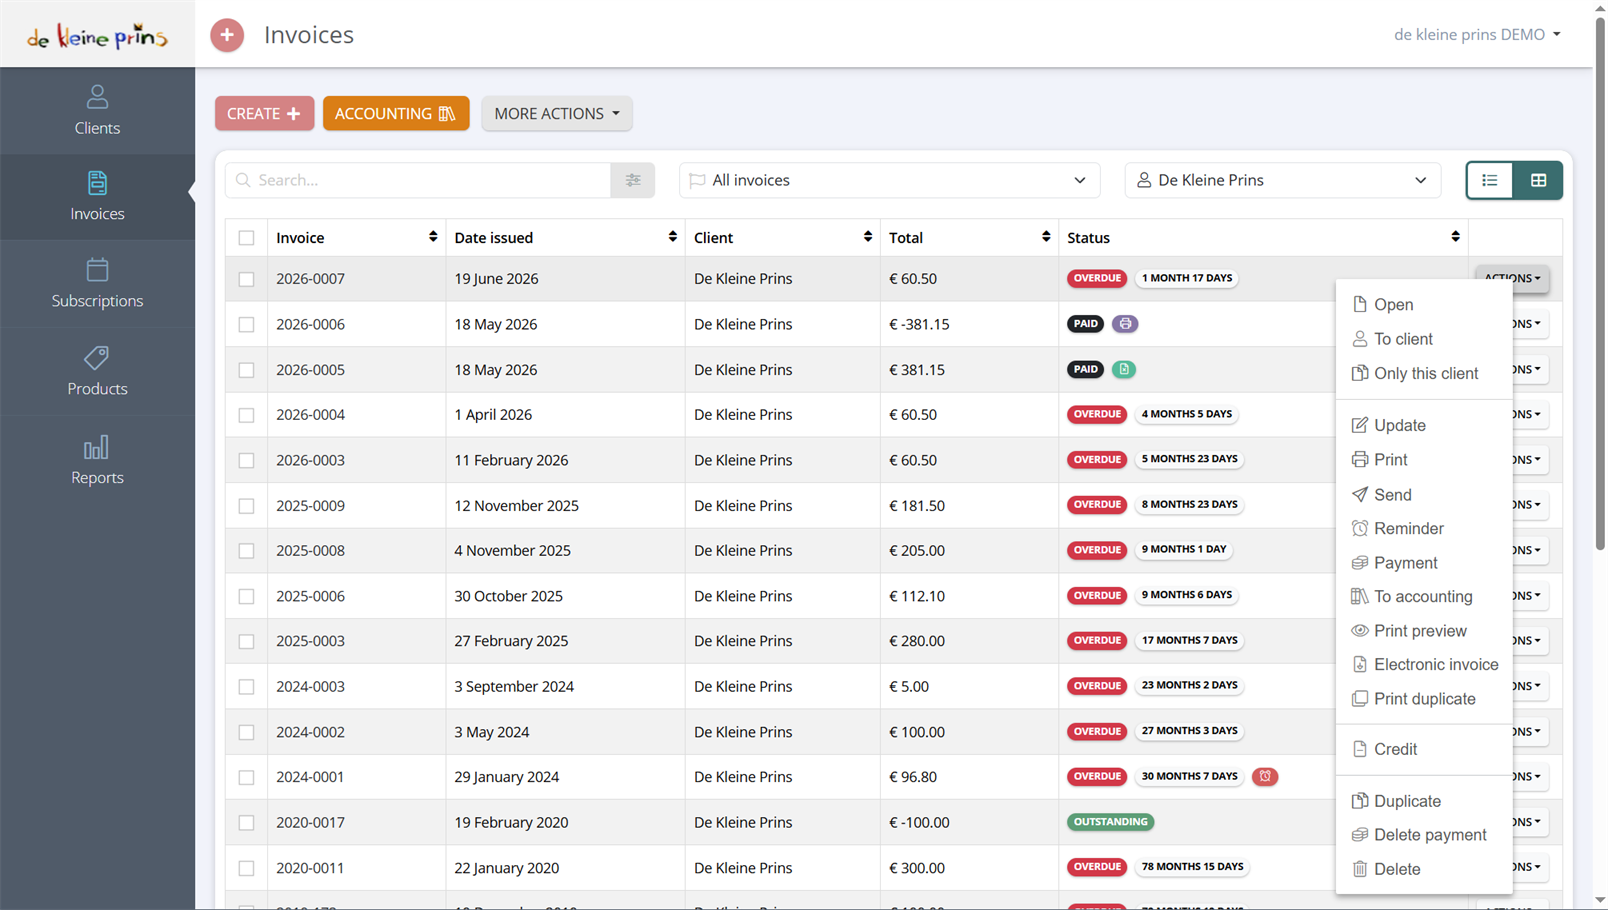
- The buttons Create, Accounting and More actions, and the filters (search, status, client) with the list/table toggle.
- The status labels: Overdue with the delay, Paid with the payment icon, Outstanding.
- The Actions menu of the first row, expanded.
The Actions button on the right of each row saves you opening the invoice. There you find:
- Open, To client and Only this client (filters the overview on that client);
- Update, Print, Send, Reminder, Payment, To accounting, Print preview, Electronic invoice and Print duplicate;
- Credit (course part 10);
- Duplicate (create a similar invoice), Delete payment (undo a wrong registration) and Delete.
With the checkboxes on the left you select several invoices at once for an action under More actions, e.g. sending or reminding in bulk. The Accounting button at the top sends invoices to the accounts in bulk; for our clients that is normally set to automatic, so you rarely need it (course part 11).
Part 2: registering a payment
Choose Actions → Payment on the invoice in the overview, or open the invoice and click Payment in the button bar. In the Enter payment window you fill in:
- the Amount you received (by default the outstanding balance);
- the Payment date (the date on your bank statement, not today);
- the Payment method: Bank transfer, Cash, debit card, credit card, direct debit, Bancontact, Bancontact Pay, eco vouchers, gift card… At the bottom of the list are three special ones: Cash discount (the client took the discount for prompt payment, course part 16), Payment difference (a small rounding difference you no longer claim) and Internal booking (settlement against a credit note, course part 10);
- optionally a Payment note, e.g. “paid by the parents” or “cash at the activity”.
The button Make direct payment via direct debit belongs to SEPA direct debit (course part 16).
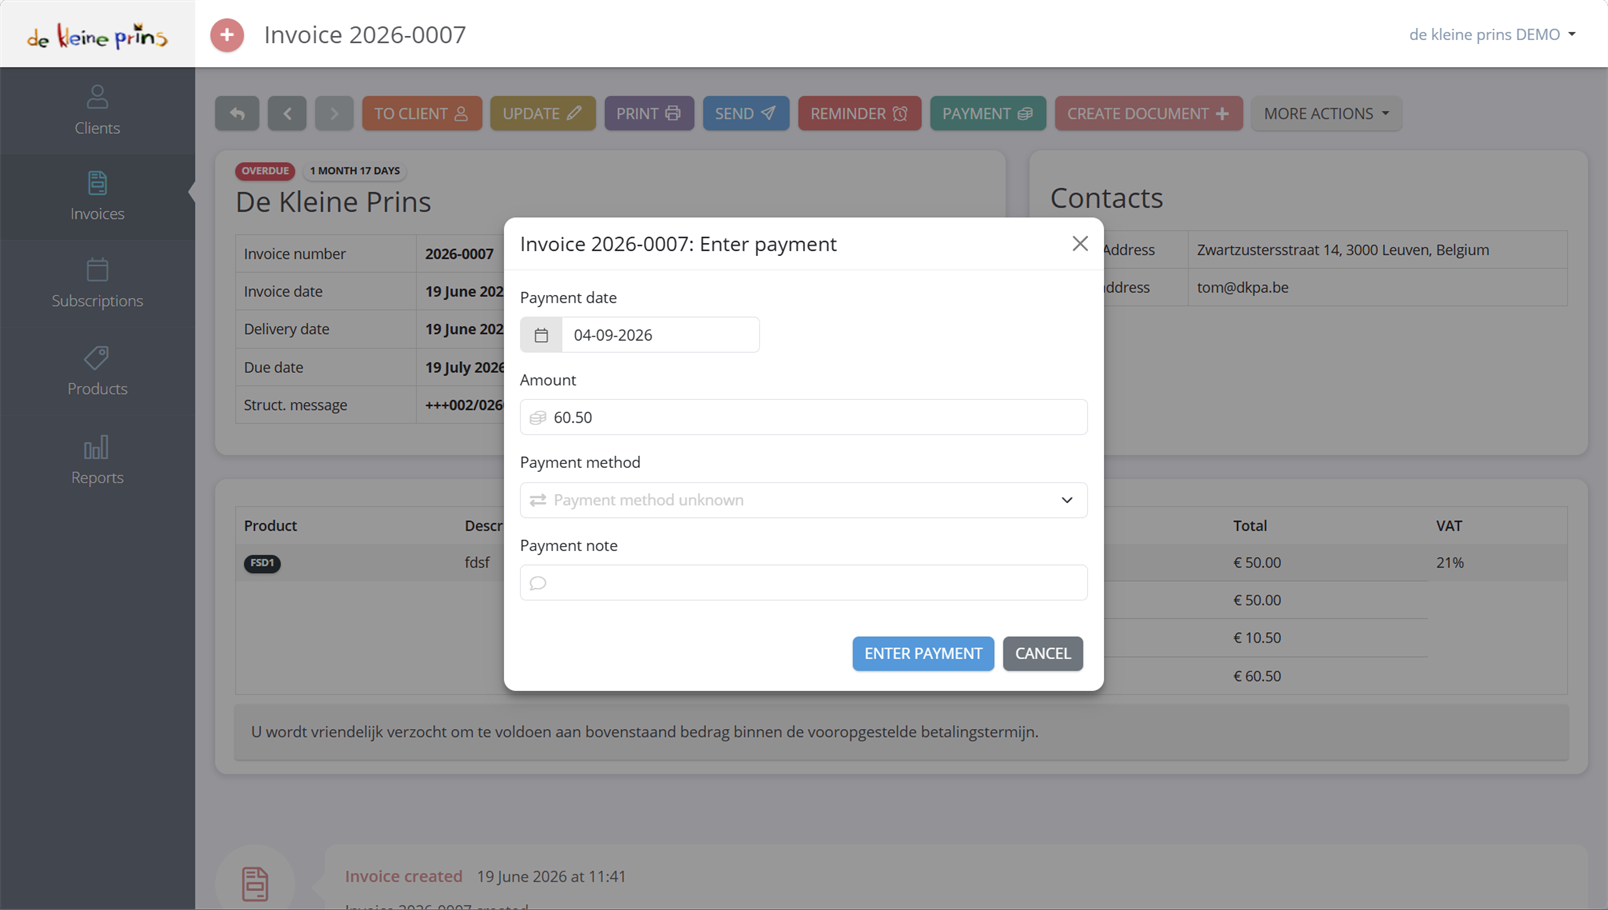
Click save. The invoice gets the status Paid (or Partially paid) and the payment appears in the history at the bottom. Three special cases:
- Partial payment. Register the amount received; The Rose calculates the balance and continues to treat the invoice as open. You can send a reminder for the balance later.
- Overpaid. Register the full invoice amount as payment and note the excess in the remark; report it to your file manager, who refunds the excess or processes it in the accounts. Never register more than the invoice amount: that distorts your reports.
- Paid with a wrong or missing message. Look up the invoice by name and amount and register the payment by hand. This is exactly why you get clients to use the structured message.
Part 3: cash payments at an activity
Many non-profits receive cash: admission, drinks, a raffle. For those you do not, in principle, create an invoice per person, but a daily receipts book in the accounts. If you do invoice an amount that is paid in cash (e.g. a membership fee at the till), register the payment with method “cash” and make sure the money ends up in the non-profit’s account with a reference to the invoice. How your non-profit keeps daily receipts is something to discuss with your file manager.
Part 4: helping the client pay correctly
Two things on your invoice make payments land in the right place by themselves:
- The structured message (+++002/0260/00806+++): whoever copies it links their payment automatically to the invoice, in the accounts and, if the bank link is active, in The Rose. Ask explicitly in your email text to use it.
- The QR code (EPC) on the invoice: the client scans it with their banking app and gets amount, account number and message pre-filled. No more typos. You switch it on once in the settings or the layout (see the supplier’s help centre).
Part 5: having payments read in automatically
Manual registration works fine for a few invoices a month. If you have dozens (membership fees, monthly rent), you want The Rose to see for itself what comes in on your account. That is possible via a bank link: The Rose reads your bank statements and links each payment with a structured message automatically to the right invoice.
As a client of dkp you have two channels, and we recommend using both:
- The feedback from the accounts. Your bank transactions are read into The Lantern via CodaBox, and the Clearfacts link sends the payment status of your sales invoices from there back to The Rose. That happens by itself, but follows the rhythm of processing in the accounts.
- The direct CodaBox link in The Rose. First switch on the component Bank under Modules (“Import bank transactions and link them to invoices”) and then choose Links → Codabox → Establish link. That way you let The Rose read your bank transactions itself, with the same CodaBox account your non-profit already has through us. Payments are then matched much faster: you see daily what has been paid, and your (automatic) reminders do not go to those who have already paid. Ask your file manager for help if the link does not work straight away.
A separate Ponto link is then not needed. Register yourself only what does not go through the bank (cash, a payment link without connection), and report it to your file manager if an invoice has been paid but remains open in The Rose.
Next step: in course part 9 you send reminders for what is still outstanding after the due date.
The screenshots on this page show the English interface of our demo file in The Rose.