
Course The Lantern - paying invoices: the invoice list and the QR code (#7)
Submitted and posted — but paid? The Lantern tracks the payment status of every invoice and helps you with the paying itself, so you never miss a due date or pay an invoice twice. In this part you get to know the invoice list — the overview of everything that needs attention — and you pay a first invoice with the EPC QR code. Paying several invoices in one go is covered in course part 8. There is also a webinar on payments (in Dutch, with English subtitles) to watch at your own pace.
Part 1: the invoice list
The best place to find the invoices you still need to pay is the invoice list: the page you land on via the Payments button. That is deliberately neither a mailbox nor the archive, but one overview of all your documents wherever they are — still in a mailbox, being processed by us, or already posted in the archive. So you need not wait until an invoice is processed to pay it, and you never need to search anywhere else.
The filter at the top is automatically set to the payment statuses that still need attention:
- Not paid — the ordinary workload: invoices for which no payment has been prepared yet.
- Expired — the due date has passed; these deserve priority.
- Partially paid — part has been paid, the balance is still open.
- To credit — a credit note is still expected or to be settled.
- On hold — deliberately parked, for instance because you dispute the delivery.
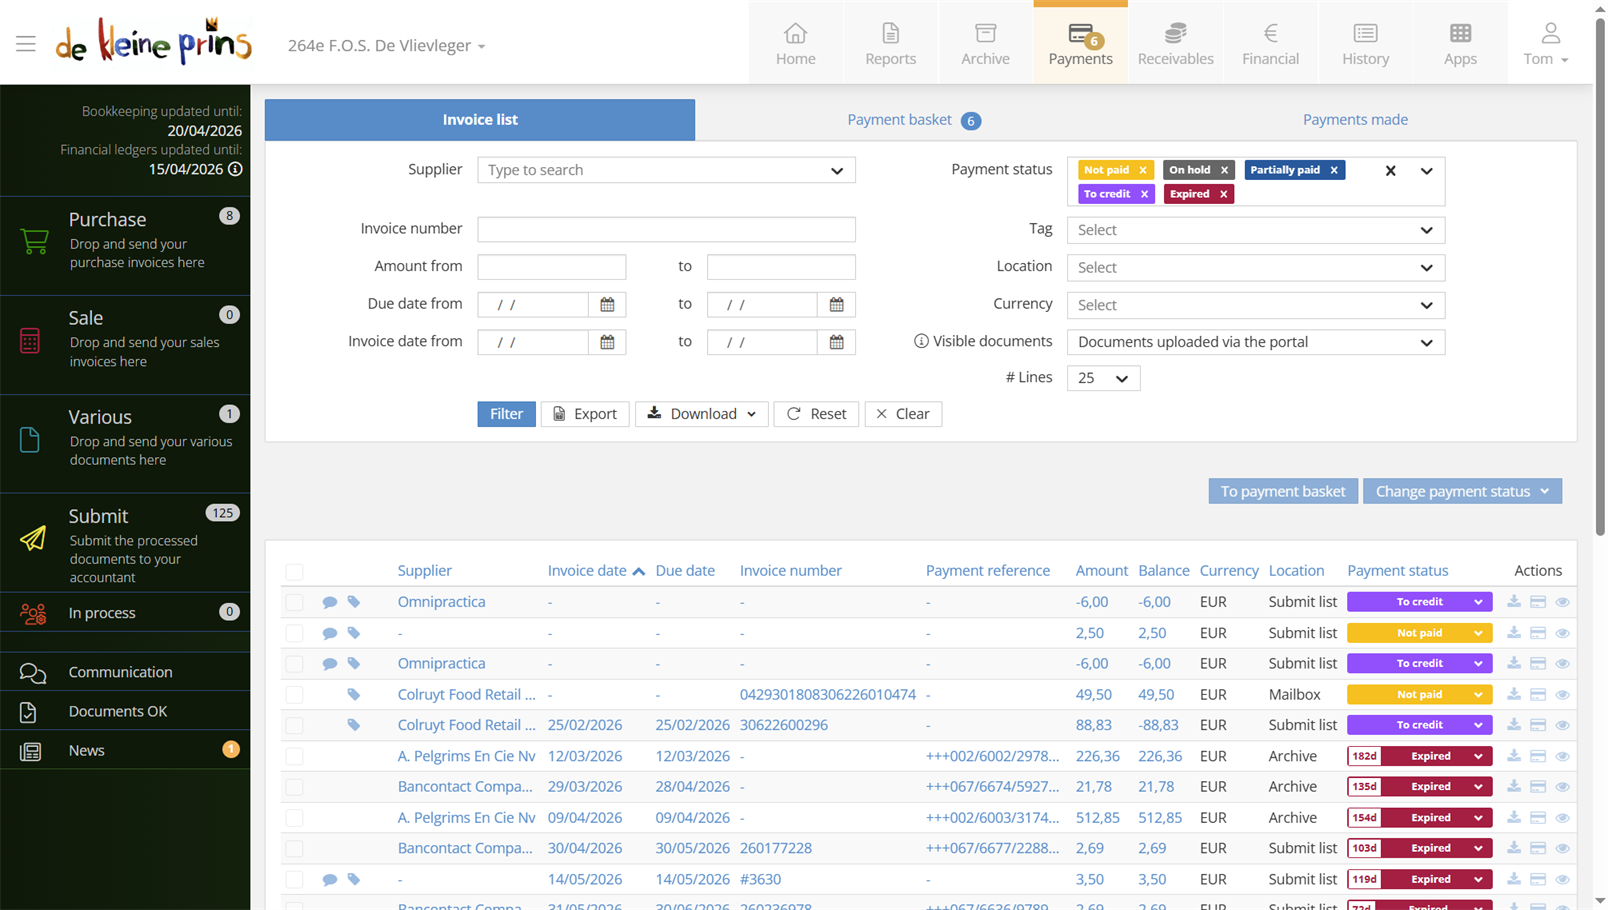
- The invoice list with the status filter at the top.
Tip: make the invoice list your fixed starting point, for instance at a weekly payment moment. Everything that needs attention is already filtered for you — working through a list is more comfortable than chasing individual invoices.
Part 2: Paid or Processed?
Two statuses you will mainly notice in the archive (course part 9), in the payment status of each document — in the invoice list they fall outside the default filter above. Keep them apart:
- Paid: the payment has been prepared or executed from The Lantern — for instance included in a SEPA file (course part 8) or registered after a QR payment.
- Processed: the payment has also actually been found on your bank statements and recorded in the accounts.
Between the two sits simply the lead time of your bank and the processing of the statements — an invoice you have just paid stays on Paid for a while. And if you do pay an invoice directly in your banking app, outside The Lantern? That works out fine too: as soon as the payment appears on your statements and is processed, the invoice automatically gets the status Processed. Only, in the meantime The Lantern does not know — the invoice stays in your list as Not paid, with the risk of a double payment. Paying from within The Lantern remains the cleanest route.
Part 3: paying a single invoice
Find the document you want to pay in the invoice list and click the bank card icon under Actions. The payment screen opens, with the document itself on the left — so you check against the original straight away — and on the right the payment proposal The Lantern has already filled in.
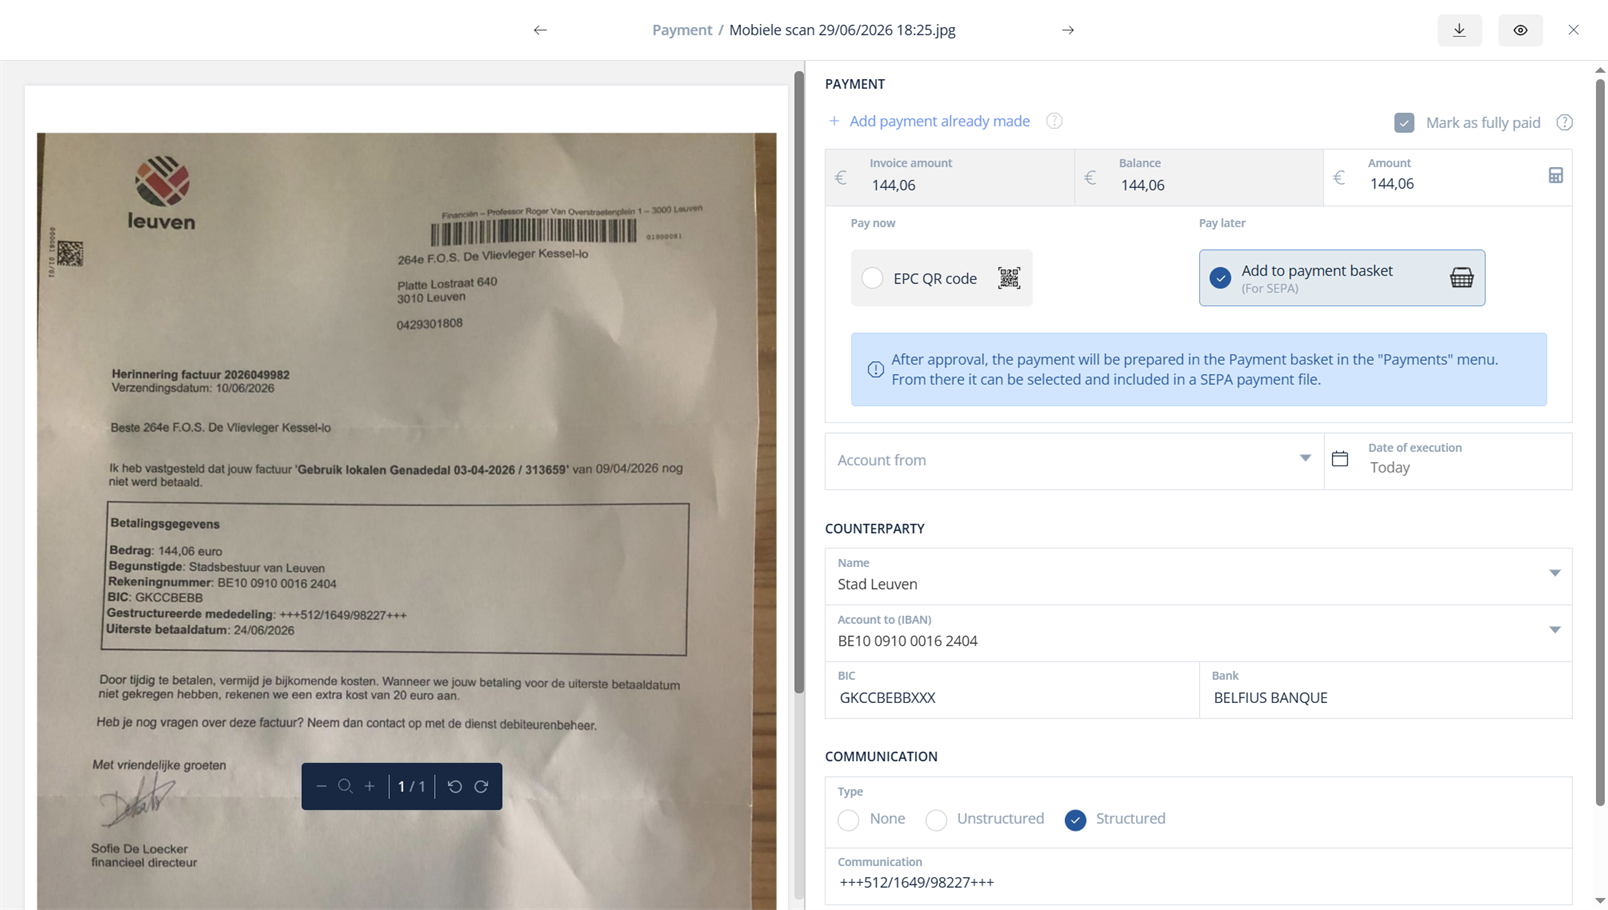
- Invoice amount, Balance and Amount — for a partial payment you adjust the amount here.
- The payment method: under Pay now the EPC QR code, under Pay later the payment basket (for SEPA, see course part 8).
- Account from (the account you pay from) and Date of execution.
- The Counterparty details: name, IBAN, BIC and bank.
- The Communication Type: None, Unstructured or Structured (the Belgian OGM reference).
If the document has already been posted (you start from the archive or the history), these details should be correct — but checking remains the rule, and one field always deserves special attention: the counterparty’s IBAN number. Invoice fraud exists for non-profits too; a falsified account number on an otherwise correct invoice is the classic scenario. If in doubt, compare with an earlier payment to the same supplier.
If your organisation uses the payment approval process, you also see an Approval block at the bottom of the payment screen — all about that in course part 14.
Part 4: paying with the EPC QR code
For one single invoice you want to settle straight away, the EPC QR code under Pay now is the fastest route — no file, no retyping. Check the details and click Create EPC QR code. The Lantern shows a QR code containing all the payment details: amount, account number and reference. You scan it with the banking app on your smartphone and confirm with your PIN — done, without typos.
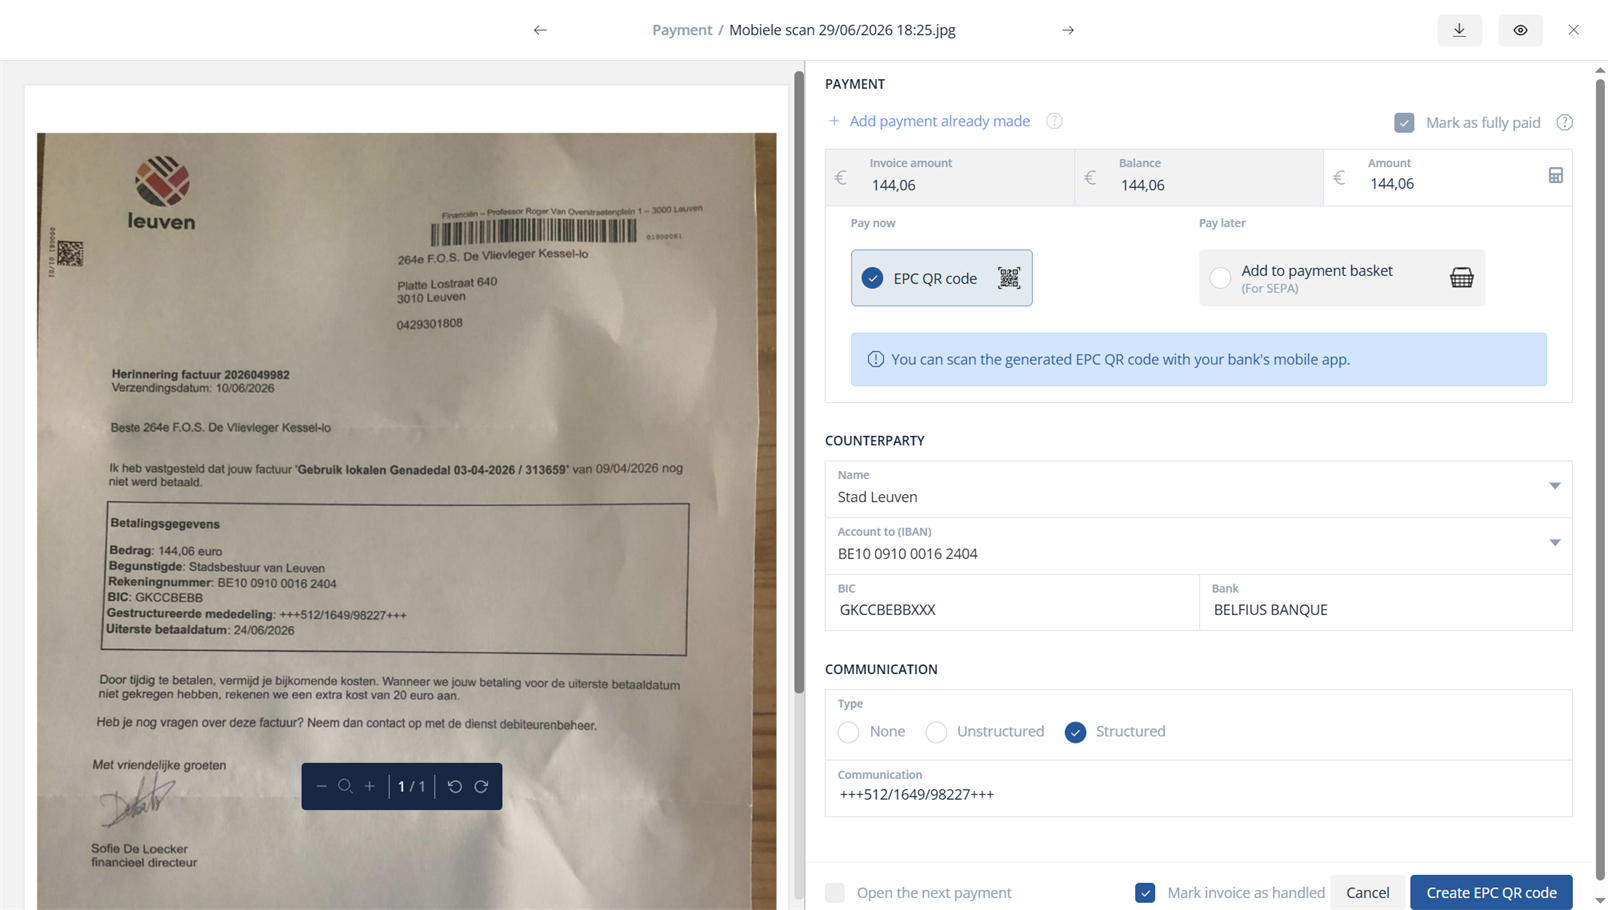
- The EPC QR code choice under Pay now.
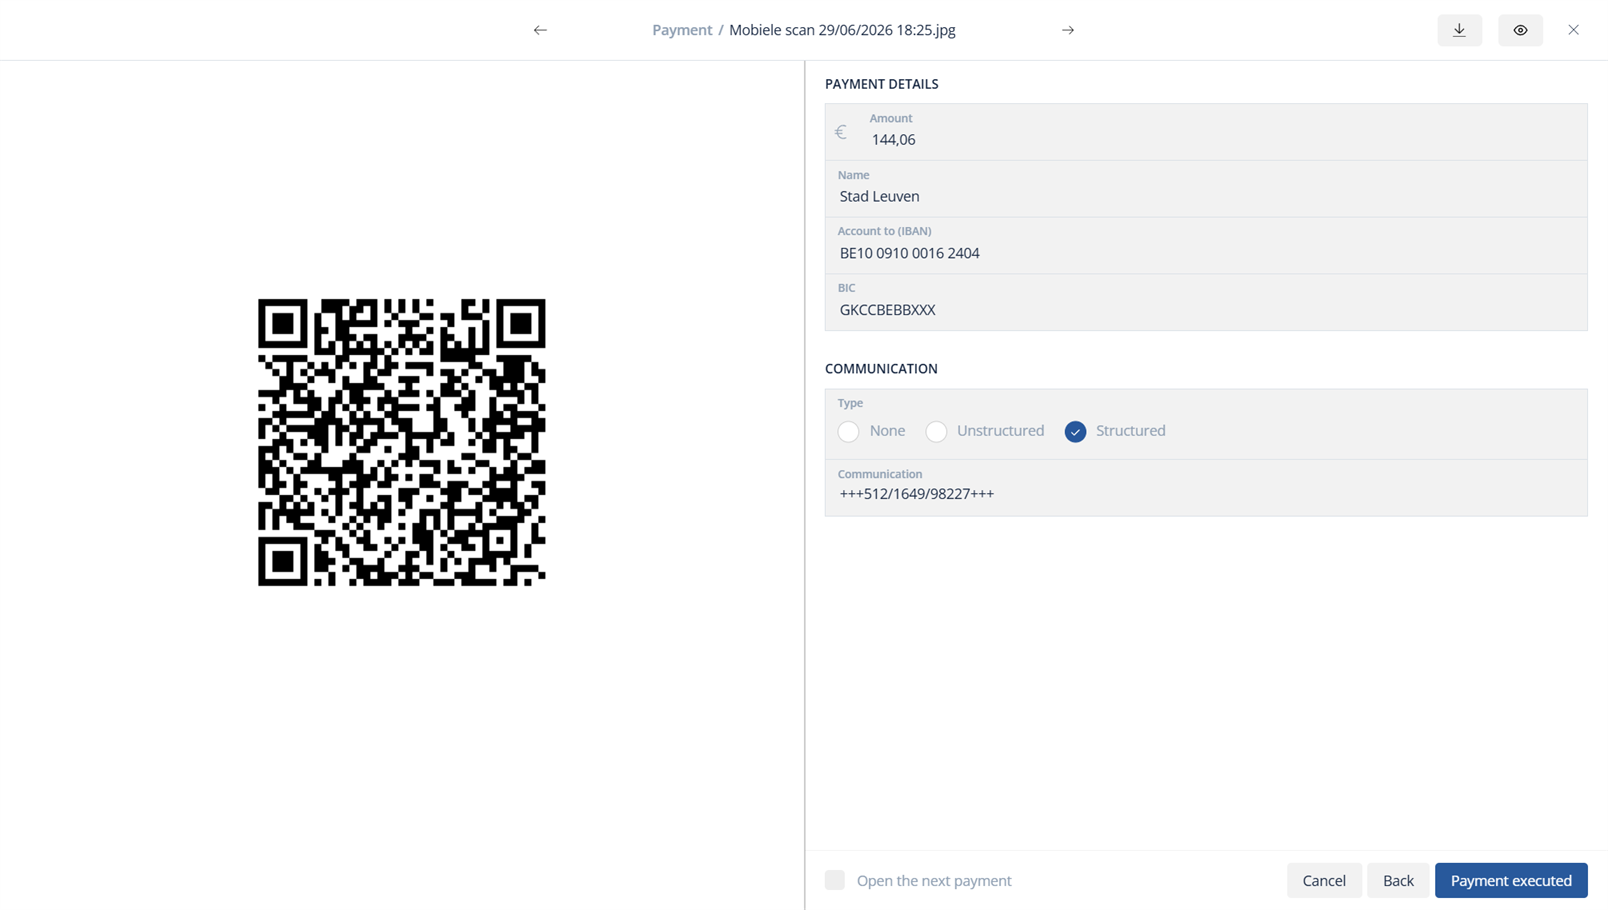
- The QR code, ready to scan with your banking app.
If you have several invoices to pay, that can of course also be done one by one with QR codes — but then the payment basket in the next part pays off: one file, one signature at the bank.
Part 5: invoices you never pay yourself
Some suppliers you never pay yourself: direct debits (energy, telecom, insurance) or suppliers that always run via the credit card. Without intervention their invoices linger in your list as Not paid — annoying, because what genuinely needs your attention drowns. For that there is the list of automatically paid suppliers: their invoices automatically get the status Paid, immediately or on the due date. How to set up that list is covered in course part 15.
Next step: paying several invoices in one go is done with the payment basket and a SEPA file — you learn that in course part 8.
The screenshots show a real file in The Lantern, in the English interface; a few images (the mobile app and the upload flow) still show the Dutch one — the layout is identical. Personal details have been redacted.